
4 Different Basting Methods to Meet Your Basting Needs
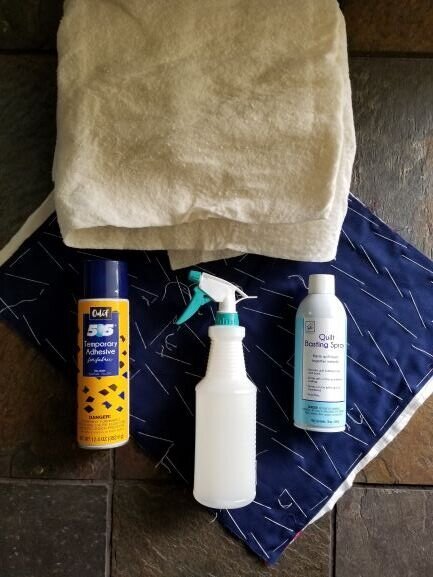
Spray Basting with a Store Bought Spray
In this video, I demonstrated how to baste a small sandwich with 505 Spray. I have also used, “Quilt Basting Spray,” that I was able to find at Wal-Mart.

Pros:
Easy to use and fast drying.
The 505 had hardly any overspray, it didn’t smell, and I didn’t find it messy at all.
Both sprays did not gum up my needle.
They both held my sandwiches together really well!
When using either of these spray bastes, I do not have to start and stop for pins in the sandwich, while quilting.
You can leave the spray on your quilt. However, the “Quilt Basting Spray” brand does state on the label that laundering will diminish the adhesive properties.
The 505 Spray’s label does state that it can be used on various types of fabric and for various methods in sewing and quilting.
They are also very forgiving. If you needed to readjust, you can pull apart the layers to reposition them. You will just have to respray that area.
Cons:
The “Quilt Basting Spray” was extremely messy (I had it all over my hands), had a ton of over-spray, and had a very strong odor.
Because the labels instruct you to use in a well-ventilated area because the fumes are toxic, I only use them outside. The 505 spray I will sometimes use in my basement where I can open windows and an outside door to keep that ventilation wide open, and I am able to close the door to my house.
The labels on both sprays instruct that dry-cleaning is the only way to completely remove this product.
If you are taking your project outside to baste, you are weather bound to that idea. Meaning, you can only baste your quilt in great weather (no wind, rain, cold temps, etc).
This method is not inexpensive.
I do this on the ground or the floor of my basement. For myself, I only use this for small projects. I will not get down on the floor for large projects, as I have a better method for that.
Spray Basting with Homemade Spray Baste

In this video, I demonstrated how to make this homemade spray baste. We also a recipe in pdf format for free.
Pros:
Very inexpensive! Almost all the ingredients are things you can find in your kitchen.
Depending what exactly you use, this can be completely non-toxic!
It is easy to make and easy to use.
The quilts hold together extremely well.
It will completely launder out.
It does not gum up on your needle.
Cons:
TIME! This is not the method, if you are in a time crunch. Ideally, you want the first half of your sandwich to dry for several hours. If you do it in the evening, I would wait until the next day, before I flipped it over to do the other half of the sandwich.
It can be a little bit messy on your hands. However, you just wash your hands, and all is well.
As I do not like to get on the floor, I only use this method for projects that are smaller than my table. Therefor, I do list this as a con.
It is not forgiving. If you needed to move your backing or your topper after it dried, it is completely not recommended that you pull apart the layers to reposition.
Thread Basting
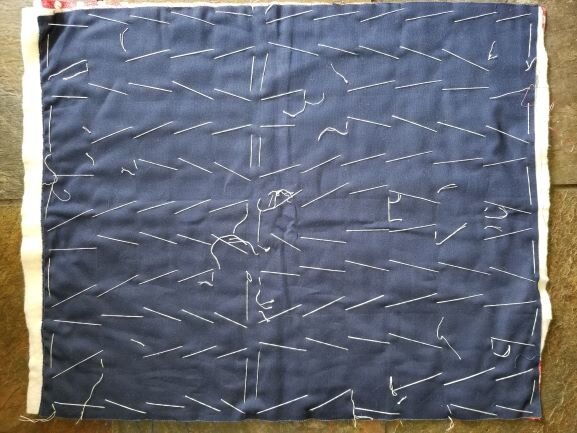
This video demonstrates how to thread baste your quilt sandwich using baseboards, thread, and a needle.
Pros:
It is fun.
It is easy.
It is relaxing.
AND, I do not have to get on the floor! This method is done on my dining room table while I sit in a chair.
It utilizes a stitch that allows you to store your sandwich for a long time, if you are not ready to quilt it right away. You can fold it or you can roll it, and the stitch will not allow your layers to shift! The layers stay put!
I use this project for large projects that I am not using my longarm to quilt.
I also find this very inexpensive.
Cons:
Because my baseboards are 7ft long, this is not my preferred method for small projects. However, you can buy shorter baseboards and be able to thread baste those smaller projects. At HALO, I usually spray baste those smaller projects.
Thread basting does take longer than spray basting.
Fusible Batting
This video demonstrates how to use fusible batting for your small project, and talks about a few pros and cons.
Pros:
The batting holds the sandwich together really well.
It is fast. When it is done cooling, you can begin to quilt your project.
It is easy to use.
It doesn’t gum up your needle.
It can be laundered out. There is no need to dry clean your project to remove all the adhesive.
It is forgiving. This means that if you need to move your fabric after you have pressed it together, it will pull back for you to pull that wrinkle out. You are then able to press it again to adhere that layer back together (up to 2-3 times, before the adhesive stops working).
Cons:
I feel this is more of a small project method. There are people that do use it for their large projects. I just feel this may be more difficult than other methods, especially because you must press it. Hobb’s packaging does suggest, if you do use it for larger projects, to use painter’s tape to hold down your backing to assist with holding it in place.
When comparing these 4 methods, I believe this may be the most expensive method.
Every week on our Facebook Page, you can find a video related to each of the methods. We discuss additional information and answer any questions that may have been asked.
Until next time, may you continued to be inspired, productive, and joyful! And may you never stop making your dreams in quilting come true!
XOXO-
Angel
Sign up with your email address to receive News, Updates, and Inspirations.